


You want to update to Windows 11, but this Windows 11 problem warning keeps appearing? Here's how to make it right:
Microsoft Windows 11 is now available, and you can use the software maker's PC Health Check tool to see if your computer meets the prerequisites for running it. Unfortunately, using the PC Health Check program often results in the error message "This PC can't run Windows 11".
If the software determines that your system hardware is incompatible with Windows 11, you will probably experience this problem. Fortunately, there are solutions to this bothersome problem that could prevent you from successfully updating to Windows 11.
What Does the Error Message for the Windows 11 Upgrade Mean?
Reading the entire error message:
This computer cannot run Windows 11; however, you will continue to receive Windows 10 updates even though it does not fulfill the system requirements.
The following error may likewise be present:
- TMP 1.2 and 2.0 must be supported by this PC.
- Secure Boot must be supported by this PC.
It's conceivable that your computer doesn't meet the minimal system requirements to run Windows 11 if you are encountering similar warnings. Having said that, the issue may also be a false alarm because it will miss detecting computers that support Secure Boot and TMP 2.0 if the features are turned off in the BIOS.
What Hardware Do You Need to Install Windows 11?
Intriguingly, the official Windows 11 system requirements aren't particularly demanding, and the majority of contemporary PCs ought to be able to run it right out of the box. There are some improvements in Windows 10, though.
The following computer specifications are needed to set up and operate Windows 11:
- 1 GHz, 64-bit, 4GB of RAM, and 64 GB of storage
- Firmware for the system that is UEFI and Secure
Boot compatible
- TPM 1.2/2.0: Trusted Platform Module
Now, if you have a computer that meets the requirements for running Windows 11 but still receives this issue when using the PC Health Check-up app, you can resolve it by making a few adjustments to your BIOS/UEFI setup.
The same problem can appear if you attempt to install Windows 11 using a setup file from the mounted ISO or a bootable device.
UEFI Boot Mode: What Is It?
A booting technique called UEFI (Unified Extensible Firmware Interface) was created to take over the role of BIOS (Basic Input/Output System). The system boots using BIOS firmware while performing a legacy boot.
In general, it is advised to install Windows using the more recent UEFI mode rather than the older BIOS mode because it offers greater security features like Secure Boot. Here are more details on BIOS.
What Brings About the "PC Can't Run Windows 11 Error?"
When you use the PC Health Check software to see if your computer can run Windows 11, you get this problem. It might also happen if you attempt to install Windows 11 using the setup file from the mounted ISO or a bootable flash drive.
Your computer must support UEFI with Secure Boot and have TPM 1.2 or 2.0 enabled for Windows 11 to work with it. If you installed Windows 10 using the legacy boot mode, Windows 11 won't recognize the necessary functionality because it requires a UEFI Secure Boot-compatible PC.
As a result, the error message This PC can't install Windows 11 as the system requirements are not met, which will appear. Even if Secure Boot and TMP 2.0 are supported by your computer, you might still need to enable them to manually fix the problem.
To enable the Secure Boot feature (and maybe turn on TMP 1.2 or 2.0 as well) if you are using legacy boot mode, you must set the Boot Mode in your BIOS settings to UEFI.
How Can I Fix the Windows 11 Can't Run on This PC Error?
The Boot Mode should be changed to UEFI, Secure Boot should be enabled, and TPM 1.2/2.0 should be enabled on your computer to resolve this problem. Please note that while the tab names may differ between manufacturers' hardware, the instructions should be universal.
- Make Windows 10's Secure Boot available.

To make Windows 10 compatible with Secure Boot, adhere to these procedures.
- Close every window that is open and save your
work. then turn off your computer.
- Press F2 to enter BIOS setup after restarting
your computer. Other function keys, such as F12, F10, F8, or the Esc key,
may be used by various laptop and PC manufacturers to access the BIOS. For
extra advice, see our tutorial on entering the BIOS if you need it.
- Use the arrow keys to select the Boot tab in the
BIOS configuration utility. Look at the Boot Mode setting to see if Legacy
is selected.
- Press Enter while the Boot Mode is highlighted to
change it.
- Pick UEFI from the list of alternatives. Select
UEFI using the up and down arrow keys, then press Enter to choose your
choice.
- Open the Security tab next.
- Using the arrow keys, select the Secure Boot
option, then press Enter.
- To enable Secure Boot on your computer, select
Enabled.
Make sure TPM 1.2 or 2.0 is enabled for
your PC after you have Secure Boot and UEFI enabled in Boot Mode. Don't,
therefore, shut down the BIOS setup menu yet.
- The "This PC Can't Install Windows 11
Error" can be fixed by enabling TMP 1.2 or 2.0.

The BIOS setup also provides access to the TMP 1.2 and 2.0 capabilities. This is the procedure.
- Activate the Security tab in BIOS/UEFI.
- Select the Trusted Platform Technology option by
scrolling down and pressing Enter. You might notice the Intel Platform
Trust Technology option on Intel laptops in its place.
- Select Enabled, then hit Enter to make your
choice effective.
- Save your changes, then leave.
I'm done now. On Windows 10, you have successfully enabled TMP 2.0 and Secure Boot compatibility. To check if the issue has been fixed, restart your computer, use the PC Health Checkup application, or install Windows 11.
- Using the Registry Editor, avoid TPM 2.0 and Secure Boot requirements.
If Secure Boot and TPM 2.0 are not supported by your PC, a solution is available to get past the restriction. We will do this by changing the registry entry, which will let you upgrade without having to comply with Secure Boot and TPM 2.0 standards.
Note that for this workaround to function, your system must support TPM 1.2 at the very least.
Please be aware that changing the Windows Registry is dangerous. Create a system restore point first, and then carry out the next step.
- Open "Run" by pressing Win + R.
- To launch Registry Editor, type regedit and press
OK.
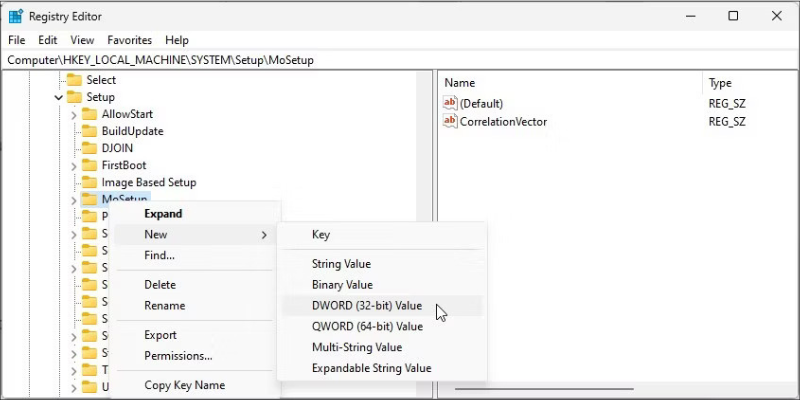
- Navigate to the following place in Registry
Editor: The registry path can be copied and pasted for speedy navigation:
Computer\HKEY_LOCAL_MACHINE\SYSTEM\Setup\MoSetup
- MoSetup can be accessed by right-clicking it and
choosing New > DWORD (32-bit) value.
If the problem continues, see our article on how to install Windows 11 with fewer prerequisites to find further ways to get around the limitations and upgrade your computer.
After converting the drive, you can switch from Legacy to UEFI boot modes without seeing the No Boot Device Found warning. Alternately, if you're going to perform a clean installation of Windows 11, make sure to install it (or Windows 10) in UEFI mode to avoid any future problems.
Make sure the bootable drive is formatted using the UEFI system in Rufus if it still does not appear in the Boot Manager after Secure Boot has been enabled. If not, make another bootable disc with UEFI (CMS) as the target system.
How to Fix the Windows 11 Can't Run on This PC Error
Windows 11 cannot be installed on
Windows systems that have the BIOS legacy firmware activated. Fortunately,
adjusting your BIOS setup utility will activate UEFI firmware mode, which will
enable Secure Boot and TPM 2.0, and this will quickly fix the issue.
 Reviewed by James
on
April 21, 2023
Rating:
Reviewed by James
on
April 21, 2023
Rating:
No comments: